环境准备
- OS: Proxmox 7.4(Debian 11)
- 软件: dnsmasq
配置
新建网络
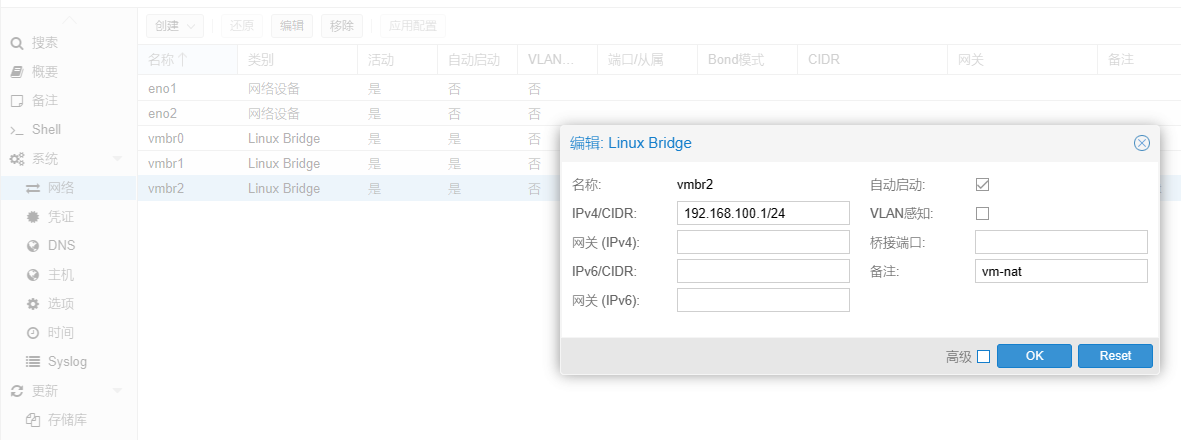
新建一个网络,例如
vmbr2

编辑网络配置
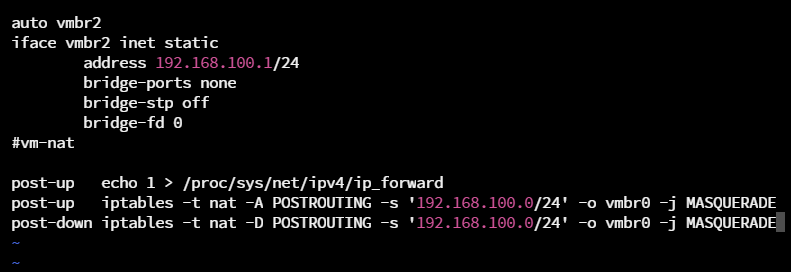
编辑网络配置:
vi /etc/network/interfaces
末尾添加以下内容:
post-up   echo 1 > /proc/sys/net/ipv4/ip_forward
post-up   iptables -t nat -A POSTROUTING -s '192.168.100.0/24' -o vmbr0 -j MASQUERADE
post-down iptables -t nat -D POSTROUTING -s '192.168.100.0/24' -o vmbr0 -j MASQUERADE

安装并配置dnsmasq,使连接到vmbr2的虚拟机能够自动获取IP地址
安装:
apt install dnsmasq
编辑配置文件:vi /etc/dnsmasq.d/vmbr2.conf
interface=vmbr2
dhcp-range=192.168.100.2,192.168.100.254,12h # 设置dhcp范围
dhcp-option=option:router,192.168.100.1 # 设置网关
dhcp-option=option:dns-server,192.168.100.1 # 设置DNS

配置/etc/sysctl.conf(部分机型可能需要配置)
编辑配置文件:
vi /etc/sysctl.conf
末尾添加以下内容(下方enp3s0修改成实际网卡名称):
#IPV4转发
net.ipv4.ip_forward=1
net.ipv4.conf.all.rp_filter=1
net.ipv4.icmp_echo_ignore_broadcasts=1
net.ipv4.conf.default.forwarding=1
net.ipv4.conf.default.proxy_arp = 0
net.ipv4.conf.default.send_redirects = 1
net.ipv4.conf.all.send_redirects = 0
#IPV6转发
net.ipv6.conf.enp3s0.autoconf=0
net.ipv6.conf.enp3s0.accept_ra=2
net.ipv6.conf.default.forwarding=1
net.ipv6.conf.all.forwarding=1
net.ipv6.conf.default.proxy_ndp=1
net.ipv6.conf.all.proxy_ndp=1
重启网络及dnsmasq服务
ifreload -a
systemctl restart networking
systemctl restart dnsmasq


